How to make your Website secure?

For a lot of organizations, websites are these things we’re compelled to build for our customers, constituents, or fans. They need one because “everyone has one” especially their competitors.  In my experience, organizations with this mentality treat their website like cheesy infomercial appliances, and once the site “goes live” little to no resources are spent maintaining it.

Websites are like pets. They’re a long-term commitment. They need constant care and attention. And just like your pet, if you neglect your website bad things will happen. Organizations who to not dedicate resources to website maintenance are punching their one-way train ticket to Hackedville.

As another reminder for the future, here are some highly recommended security tips:
  • Keep System up to date:It may seem obvious, but ensuring you keep all software up to date is vital in keeping your site secure. This applies to both the server operating system and any software you may be running on your website such as a CMS or forum. When website security holes are found in software, hackers are quick to attempt to abuse them.Also, make sure that you have up to date Spyware / Malware / Anti Virus protection on any computer that connects to the site via FTP and SSH. Run a scan on these machines and fix whatever issues arise.
  • SQL Injection: SQL injection attacks are when an attacker uses a web form field or URL parameter to gain access to or manipulate your database. When you use standard Transact SQL it is easy to unknowingly insert rogue code into your query that could be used to change tables, get information and delete data. You can easily prevent this by always using parametrized queries, most web languages have this feature and it is easy to implement.
  • XSS:Cross site scripting is when an attacker tries to pass in JavaScript or other scripting code into a web form to attempt to run malicious code for visitors of your site. When creating a form always ensure you check the data being submitted and encode or strip out any HTML.
  • Error Messages:Be careful with how much information you give away in your error messages. For example if you have a login form on your website you should think about the language you use to communicate failure when attempting logins. You should use generic messages like “Incorrect username or password” as not to specify when a user got half of the query right. If an attacker tries a brute force attack to get a username and password and the error message gives away when one of the fields are correct then the attacker knows he has one of the fields and can concentrate on the other field.
  • Server Side Form validation: Validation should always be done both on the browser and server side. The browser can catch simple failures like mandatory fields that are empty and when you enter text into a numbers only field. These can however be bypassed, and you should make sure you check for these validation and deeper validation server side as failing to do so could lead to malicious code or scripting code being inserted into the database or could cause undesirable results in your website.
  • Passwords: Change all FTP user account passwords. Make sure the passwords you reset are secure. Use upper and lower case lettering and numbers. Everyone knows they should use complex passwords, but that doesn’t mean they always do. It is crucial to use strong passwords to your server and website admin area, but equally also important to insist on good password practices for your users to protect the security of their accounts.
  • File Uploads: Allowing users to upload files to your website can be a big website security risk, even if it’s simply to change their avatar. The risk is that any file uploaded however innocent it may look, could contain a script that when executed on your server completely opens up your website. If you have a file upload form then you need to treat all files with great suspicion. If you are allowing users to upload images, you cannot rely on the file extension or the mime type to verify that the file is an image as these can easily be faked. Even opening the file and reading the header, or using functions to check the image size are not full proof. Most images formats allow storing a comment section which could contain PHP code that could be executed by the server.


  • SSL: SSL is a protocol used to provide security over the Internet. It is a good idea to use a security certificate whenever you are passing personal information between the website and web server or database. Attackers could sniff for this information and if the communication medium is not secure could capture it and use this information to gain access to user accounts and personal data.
  • Security Tools: Once you think you have done all you can then it’s time to test your website security. The most effective way of doing this is via the use of some website security tools, often referred to as penetration testing or pen testing for short.

    There are many commercial and free products to assist you with this. They work on a similar basis to scripts hackers will use in that they test all know exploits and attempt to compromise your site using some of the previous mentioned methods such as SQL injection.

References:

http://infospace.ischool.syr.edu/2012/02/07/how-to-keep-your-website-secure-and-avoid-hacking/

http://www.anhosting.com/blog/2011/05/9-ways-to-make-your-website-secure/

http://www.creativebloq.com/web-design/website-security-tips-protect-your-site-7122853
Apache SSL/TLS Certificate Installation

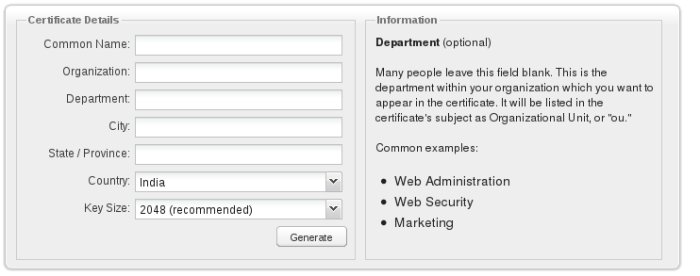
OpenSSL CSR Wizard

1. Fill in the details, click Generate, then paste your customized OpenSSL CSR command into your terminal.

Screenshot from 2014-11-14 15:32:54

OpenSSL creates both your private key and your certificate signing request, and saves them to two files: .key, and .csr. You can then copy the contents of the CSR file and paste it into the CSR text box in the order form.

Apache server SSL Certificate Installation

1. Copy the certificate files to your server.

Download your Intermediate (DigiCertCA.crt) and Primary Certificate (your_domain_name.crt) files from your Customer Area, then copy them to the directory on your server where you will keep your certificate and key files. Make them readable by root only.

2. Find the Apache config file to edit.

Apache configuration files are typically found in /etc/httpd. The main configuration file is usually named httpd.conf. In some cases the <VirtualHost> blocks will be at the bottom of this httpd.conf file. Sometimes you will find the <VirtualHost> blocks in their own files under a directory like /etc/httpd/vhosts.d/ or /etc/httpd/sites/ or in a file called ssl.conf.

3. Identify the SSL <VirtualHost> block to configure.

If you need your site to be accessible through both secure (https) and non-secure (http) connections, you will need a virtual host for each type of connection. Make a copy of the existing non-secure virtual host and configure it for SSL as described in step 4.

If you only need your site to be accessed securely, configure the existing virtual host for SSL as described in step 4.

4.Configure the <VirtualHost> block for the SSL-enabled site.

The easiest way to do this is to uncomment the following line (i.e. remove the # character) from the httpd.conf file #Include conf/extras/httpd-ssl.conf which has most of the SSL related settings configured out of the box for you. You just have to point the VirtualHost settings to your website, directories and certificate files.

Adjust the file names to match your certificate files:

  • SSLCertificateFile should be your DigiCert certificate file (eg. your_domain_name.crt).
  • SSLCertificateKeyFile should be the key file generated when you created the CSR.
  • SSLCertificateChainFile should be the DigiCert intermediate certificate file (DigiCertCA.crt)

5.Test your Apache config before restarting.

Run the following command:apachectl configtest

6.Restart Apache.

apachectl stop
apachectl start


References:

https://www.digicert.com/ssl-certificate-installation-apache.htm

https://www.digicert.com/csr-creation-apache.htm

https://www.digicert.com/easy-csr/openssl.htm


Introduction to SSL Certificate Configuration

Secure Sockets layer(SSL) is a standard cryptographic protocol for secure communication over the Internet. SSL allows sensitive information to be transmitted securely. The browser and the server need an SSL certificate to establish a secure connection. SSL certificates have different kinds of keys: public key, private key, session key. The certificate also contains a “subject” which is the title of the certificate/website owner.

Certificate Signing request(CSR) is a process which creates public and private key on your server. The CSR data file that you send to the Certificate Authority(CA) contains the public key. The CA uses public key to create a data structure to match your private key. The CA never sees a private key.

Steps in the creation of Secure Connection:   browserservercommunication

  1. Browser connects to a web server secured with https and requests it to identify itself.
  2. Server sends a copy of SSL certificate that includes its public key.
  3. If browser trusts the certificate it encrypts the public key and send a session key to server.
  4. Server decrypts the session key using its private key.
  5. Both of them now encrypt all transmitted data with the help of session key.

SSL Self Signed Certificate configuration for Apache(Kali Linux):

1. Open terminal and type sudo make-ssl-cert generate-default-snakeoil The snakeoil cert is the default ssl cert for services that use ssl in the linux distribution.

Screenshot from 2014-10-31 11:18:12

2. Then, type sudo a2enmod ssl. This command enables ssl.

Screenshot from 2014-10-31 11:27:46

3. Type a2ensite default-ssl.

Screenshot from 2014-10-31 11:28:34.

4. Type sudo service apache2 restart. Apache needs to be restarted for implementing new configuration.

Screenshot from 2014-10-31 11:32:20

5. And Now you will be able to open localhost with https.

Screenshot from 2014-10-31 11:33:20

Compression Ratio Info Leak Made easy(CRIME) is a security exploit against secret web cookies over connections using the HTTPS protocols that also use data compression. This attack taught us that using compression can endanger confidentiality. In particular, it is dangerous to concatenate attacker-supplied data with sensitive secret data and then compress and encrypt the concatenation. HTTP compression will be enabled only if both the browser and client supports it. Many browsers and servers support it because it enhances performance. To disable compression in Apache,

1. Type sudo a2dismod deflate.

2. Now, restart apache2 by typing sudo service apache2 restart.

For more information:

http://en.wikipedia.org/wiki/Transport_Layer_Security

http://ubuntuforums.org/showthread.php?t=2003654

https://www.digicert.com/ssl.htm

http://en.wikipedia.org/wiki/CRIME